Wednesday 30 June 2010

The Back And Finish

As I was looking for suitable backing material for the Character Quilt Version 2 (what a coool name! Bah), memory flooded back to me... my mother wanted this quilt to be reversible - just like the one she made herself! She seems to have a taste for reversible quilts.

I was inwardly groaning because I remembered quilting the first character quilt, which has a pieced backing, and how I always got stuck on the lumpy seams where they all magically met at once!

But at least I didn't have to search further for backing fabric - all that was already planned since last fall ;)

She wanted extra blocks on the back, but shaped like an H, which is the initial of her friends last name.


So I did some more figuring and a bit of adapting of the original plan and came up with this: 7 theme blocks, three on each side for the H-legs and one in the center of the H-bar, with red fabric between the blocks, 1" black sashing to outline the H and red fabric on the edges. Tadaa, I love having a plan to follow!

After some cutting, re-cutting (remember the seam-allowance!!!), and re-re-cutting (remember to "measure twice, cut once", not "measure without paying attention and cut away"), I put the thing together and I did come out like I had imagined it. I also pressed the seams open on the top and that will hopefully reduce some of the bulk!


I was undecided between simple pebble quilting (oh the time, oh the thread, but oh the nice look), loops or a totally different pattern on the red.


What I ended up with is this: random McTavishing - i.e. I vaguely remembered what it looks like and did a few variations on it all over the red on the front.


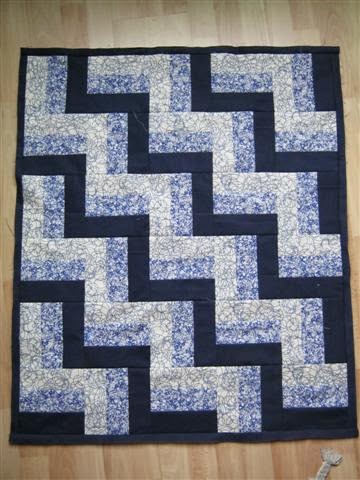
Another one ready to go to its new owner - I loved how quickly this quilt came together (it's been done for a while) - that's always a great feeling :)

The other day was just beautiful here, nice warm air with a breeze, so I decided to go to the water front and read a book (I live right near the harbour).


Of course this thing had to come by and add its noise to the serene scene ;) It seems every port city has one of these amphibian vehicles - in Halifax, NS, it's called the Harbour Hopper. Must be the same company, just must! The tourists on it seem to be half-coerced by the over-animated tour guide to wave at EVERYONE! In Halifax they're encouraged to go "Ribbit, ribbit". The vehicle sounds like a war-tank with a constant hum. I'm quite familiar with it, because its route goes right by my place, so I get to listen to it and the yelling tour guide ("To your right you can see THE most amazing building in town, it was built in...) hourly in the summer ;)

Monday 28 June 2010

Wonder Chain Done

I finished the border quilting on the wonderland chain, or the Wonder Chain, as I call it :), so it's now time for binding!

I've recently started attaching the binding with my needle in the right position (as opposed to the center position).


I find that both sets of feeds (on my walking foot and the machine) now grip the bulky sandwich of quilt and binding. Also, since I cut my binding strips only 2" wide for double-fold binding, having the needle off to the right and adjusting my quilt position only a little bit - I get a really REALLY scant 1/4" seam, so that attaching the binding is much easier. Before I switched the needle position, I often had to cut some fabric/batting away from the quilt edge. No more!


I'm also still joining my binding at the end instead of overlapping the ends. It just looks so much neater. The time it takes to join the strips in the end is made up for by the trouble I save sewing on the bulky overlap :)


And... done :)


I was on such a roll, I pretty much hand-stitched the entire binding in one sitting.


I LOVE how the border quilting pops out! Just LOVE it! Doesn't it look tasty? Totally 3-D :)


I started making a pair of scissors like the ones in the snip snip print in one of the white centers between the chains, but I really didn't like the look of it, so erased it.


I think I might just leave the quilt as is... :) Don't mess with a good thing!

Right now I'm going through a highly productive quilting phase. My quilt room (i.e. living room) looks accordingly, sigh... I'll blog about the different projects you see here in the next week(s), so stay tuned!

{next to the folded up Disaster (Triple Irish Chain) quilt that is STILL waiting for a border, basting and quilting - *sigh* - you can find my Imagination 1 quilt on the couch - I'm almost done with the border! Yippee! To be revealed soon!}


What a mess! *grins*

Saturday 26 June 2010

Something Slightly Different

... using slightly different colours and prints than I normally do.

... using a previously-tried pattern in a different way.

I sewed most squares of a Moda ZippityDooDah charm pack into 9-patches...

... and turned them into disappearing 9-patches (D9P).


Played around with the layout a bit, but didn't quite like the traditional layout (though it looks better on the photo than in real life).


I ended up sewing them into columns and adding some sashing.


The result is simple - and I like it :)

Wednesday 23 June 2010

Fabric Spree

The reason I didn't buy any fat quarters at the last quilt guild meeting is fairly simple. I just bought 21 yards of fabric the day before and was thoroughly disgusted with the thought of more fabric. Kind of like Thanksgiving with cotton instead of turkey :)

This is what happened - the guild sent a notice around that a lady from South Carolina had closed her fabric store and is spending the summer on PEI and she happened to bring her left overs with her. To be sold at 2$/yard.


Weeeeell! So off I drove, 50 km west of PEI's capital, through fairly rural areas (well, never mind, this whole province is rural, urban doesn't really exist. In fact, there's a big farm smack in the middle of the capital Charlottetown).

The choices weren't what I had dreamed off after reading Hawaiian prints and Japanese "cute" prints.

It was more stuff like this:

But heck, for 2$/yard, I bought anything I remotely liked and then some - most of these fabrics will hopefully go into charity projects, e.g. for the children's hospital. There were a lot of "scrubs" type prints, with dogs and cats wearing nurses' uniforms and blurting out courageous messages.


Not my usual taste of prints (the cartoon animals), but since I'm not likely to cut into my designer fabrics for charity quilt (my charity stops there!), these will be ideal - also for the backings of those quilts!

Oh, and the striking red Hawaiian print - I read Hoffman on the label and thought "Heck, that's good quality, it won't bleed, I'm not going to wash all these fabrics by hand in scalding water", so I chucked it in with the others - the water started to turn red immediately.

So after a quick rescue and hoping that dilution is the solution to pollution in my washing machine, I ended up hand-washing the red anyway and then just chucking it in before the spin cycle after most of the red had run out in the bath tub. Sigh, disaster averted, and I'll think twice about the fabrics I'll match this one with!

Monday 21 June 2010

Last Meeting and Vote

Last week was the last quilt guild meeting before the summer break - that means it was potluck time... so much food! Yum :)

At this special meeting, we also have local vendors bring a great selection of fat quarters - I refrained!!! (You'll find out soon why...)

Next, it was time for the grand President's Challenge Awards!

Here are all the participants holding up their entries:


And here are the four winners:

From left to right: best choice of colour, best traditional design, best contemporary design and viewer's choice.


Amazingly, you voted fairly similarly! And you covered all four winners - I'm actually quite surprised at this :)

Your votes:
Best traditional design (unanimous)

Best contemporary design (unanimous)

Best choice of colour: tied between


Viewer's choice tied between:


After the awards ceremony, we had an extensive Show & Share, here are some impressions:


This quilt was absolutely massive! Probably one of the biggest quilts I've ever seen...


And that's it for the quilt guild until September. I'm trying to get a few people together for social quilting over the summer, let's see if we can figure out our schedules enough to find meeting times ;)

Saturday 19 June 2010

A Blog To Be Recommended

I've been following Lane's blog at That man Quilts? for a while now and it's high time I gave it my highest recommendation - besides the amazing quilts he does, he writes wonderful stories, especially on his way-back-Wednesday posts. Here's one for you to try, about "An old man and his dog".

Thursday 17 June 2010

More Character Than I Expected

Time for a new quilt - again :) Nope, not that one, but one just like it!


When my mother visited me last fall, she saw the character quilt (see above) I made for a friend of mine and really liked the idea. So she wanted one for a friend of hers, who incidentally likes black and red together as well.


I got to use many of the same fabrics, e.g. the cheese fabric, skiers, dancers, coffee text and even the fabric that Ginny had sent me when I was searching for coffee-can fabric.
I went through all the same steps making the blocks, i.e. fussy-cutting the theme fabrics, adding black borders, then adding red borders of random thickness to get an offset effect on the blocks.


I was considering joining the Worshop in Progress over at Naptime Quilter, a fellow Canadian blogger, so I took quite a few pictures of the making of this quilt. The planning was already done, so I forgot to cover that part.


But I'm not sure I want to blog extensively about every quilt I make, from calculations to mishaps etc.


What do you think? Are you interested in the behind-the-scenes or are you someone who prefers to see the final product?


I did take some photos to show that quilts look fine even if things aren't perfectly lined up throughout the piecing ;)


Sometimes pieces are slightly different sizes or I didn't crop them down perfectly, but the next piece might just align perfectly again. I'm too lazy to square everything up more than once (just before joining rows), and generally just adjust as I go - unless my seams are off more than 1/8" - that much misalignment I can rescue :)


You may have noticed that I was working with paper labels to number my rows this time. I also pinned all the blocks per row together before heading to the sewing machine so nothing would get mixed up.


And wouldn't you know it? I mixed something up anyway! I'm amazed this happened, and I only caught it as I finished the last seam of joining all the rows. Two bare blocks together - that can't be! Horrible layout with all that dead space at the edge!


So out came the seam-ripper.


I'm sure there are many ways of ripping seams. If I don't care about the fabric, I'll do the slicer-method, setting the seam-ripper against the thread in between the fabrics and slicing right through it - there's a bit of danger of catching the fabric and tearing a whole, though.

Or you could carefully rip stitch by stitch in between the fabric, gently tugging them apart as the stitches release.

My preferred quick yet safe method is this: On top of the fabric, I rip every 5th or 6th stitch all the way along the seam as shown in the pic below. The I pull the fabric apart with my thumbs in between the layers and the rest of my fingers on the outside, such that my thumbs pull apart on the stitches that are a bit down from the start of my intact seam. The torn stitches will make each seam section come apart from both ends so the whole thing just plops apart.


Makes a bit of a mess though. You get one long thread from the back of your seam and 5-6 stitch-long pieces of thread from the front - they mostly get caught in the fabric and it's a bit tedious to pick them out.


So the funny thing about this was that as I had been sewing blocks together, I was thinking that it would be a pain if I put a theme fabric block in upside down, and that I'd have to figure out a way to switche just one block in the middle of the quilt and how I'd do that. Then I laughed at myself and thought "Just put them all in right side up!" and was at piece with myself. Little did I know that not 15 min later I had to do exactly that: switch a block. Luckily it was near the edge, so fewer seams to redo! I just took the two blocks that were switched out, but left them attached to each other and turned the whole pair around.


The fabric here was non-directional, so I could do that without now having trees with the roots pointing up!


And, as always: All is well that ends well ;)


Up next, the backing!

And today's special question: Do you have a cool way of ripping seams?