This was supposed to be my first tutorial, but the
Baby Wheely quilt was finished much faster than this full sized quilt, so now it's my second. And with that comes a belated word of warning: I'm sure I don't know half the technical terms used in quilting, so I've tried to illustrate wherever I can! I've made this quilt, so the measurements all work. I also thought I was oh-so clever to have thought up the method of making a block, cutting it up and realligning it for a bento box quilt, but I've recently read some references to this on other blogs, so I guess I'm not so special after all *grins*.
Enjoy and if you have any questions, comment away, of course!
(1) FABRICS & MEASUREMENTS
Choose your fabrics, whichever fabrics you want, as long as the two colours you choose per block are contrasting - this gives the best effect for the bento box. But of course, fabric choice is always up to your creativity. There are lots of wonderful examples of bento box quilts online, whether they use just two colours throughout or many different colours. I always use 100% cotton fabrics and try to match fabric heaviness/density.
Choose two colours to go into a block and cut a 5" strip of each fabric.
Off this strip, cut a 5" piece (for one 5x5" square per colour). Cut the rest of the strip in half lengthwise for two 2.5" strips. Lay these on top of each other and cut at 13", 9", 9", and 5". Do this for both colours.
You should end up with (per colour):
1- 5"x5" square
2-5"x2.5" strips
4-9"x2.5" strips
2-13"x2.5" strips
 (2) SEWING THE BASE BLOCKS TOGETHER
Lay your strips out in the following order:

Make sure that you have alternating colours in each square "ring" and that you always add your border strips to a side with seams! That might sound weird, but it means that if you start by adding the first border (the 5"x2.5" pieces) to the sides of the center square, then add the first strips of the second border to the side as well.


I sometimes use pins to keep the edges of my fabric pieces straight and avoid stretching. If you pin, make sure not to sew over the pins, that can cause machine damage and injury to you.


Everytime you've completed one border layer, press your seams flat, from the back and then from the front, it'll make your blocks much neater:

[A NOTE ON PRESSING SEAMS]
Because I made this pattern up as I went along, I didn't consider seam direction during pressing. If you press your seams open, you won't have a problem with this, but if you press seams to one side then you should press all your seams in the same direction per block. For example, press all horizontal seams up and all vertical seams left.
Because I pressed every seam towards the outside of the block, I ended up having to switch pressing direction when I was making my final bento box block. This will make my quilt lumpier, but I'll have to live with that, rather than 6 fabric layers where seams are pressed in the same direction!


Keep adding border after border:


I kept all my pieces together, the loose ones with the growing squarees, so I wouldn't mix them up later:

Despite my careful sorting, this happened:

And I didn't do this for illustrative purposes, I actually didn't notice four wrong seams, oops!
Out comes the ripper...

I string all my blocks-in-progress together to save time (no snipping of thread all the time) and thread. Just make sure you are doing the block right, or you'll end up with all your blocks being wrong ;) It's safest to do one complete block first to make sure all the measurements and seams are working.

 (3) TRIMMING THE BLOCKS
This is optional at this stage, because the outside of the block doesn't matter yet. I often don't trim my blocks at all, but it can save some hassles when you're finishing your top, especially if some blocks really come out wonky. I usually try to work as diligently as I can when piecing, so that I can save the tedious work of measuring and trimming blocks.
If you do trim, measure all your blocks and trim them to the size of the smallest block. You shouldn't have to trim more than 1/4" - 1/2". If that is the case, either redo the block, and carefully check out how you do your 1/4" seams while sewing, or live with smaller blocks and less proportional borders.
If your blocks are squared up nicely (i.e. each border is at right angles) you can line your ruler up with a seam parallel to the edge of the block as you see in the photo below and use that as guide to get a straight edge. For the next edge, turn your block clockwise, line a horizontal ruler line up with the bottom of your block (the edge you just trimmed) AND with the parallel seam and trim the next edge. Keep rotating two more times and you're done.

There wasn't a lot to trim off this block, just the bit on the top corner, but I've had other blocks that needed more trimming!

You should now have lots of pairs of pre-bento box blocks ready for cutting (drum roll):
 (4) TAKING BREAKS
Don't forget to re-charge on some treats in between!
 (5) CUTTING THE BLOCKS APART AND RE-ALIGNING THE PIECES
Cut the block in half by laying the 2 1/4" mark of the ruler on top of the seam between the center square and the first border:

Deep breath and cut:

Do the same in the other direction:

Now you should have four equal squares:

And a matching set of the opposite colour combination, just like a photo negative:

Now it comes to switching the squares to make the bento box block. This is just a bit tricky if you care about symmetry and want the seam on the corners of your quilt to all have the same orientation. With that I mean: as you follow each border, you want to see a long piece, then a short piece, then a long piece etc. In these photos, I'm pointing out which pieces I switched, and you can see how in the end, each bento box block is made up of identical squares (in terms of layout), and the two blocks go in different directions. Sorry if I'm confusing, I've never realized how difficult it is to describe these things in writing. Let me know if you have questions!


Another example: (the yellow seam ripper indicates pieces to be switched)


 (6) SEWING THE FINAL BLOCKS
Sew your 4 block pieces together as you would a four patch: make two rows,then join the rows.


The last seam completes the block:
 (7) FINAL LAYOUT
For my quilt, I decided to keep some blocks uncut to have a mixed-block bento box quilt. It seemed a bit too busy.
I trimmed all the final blocks to 12 1/4", the smallest common denominator, and laid them out all mixed together before assembling the rows.


Sew each row together, nestling seams where possible, then join the rows. Mark your rows with numbers and don't work when you're tired, or you mess up the order like I did. I liked the original layout better, but by the time I noticed, I had gone too far to rip all the seams out.
 (8) BORDERS
For my quilt, I decided to do interrupted borders on this quilt so cut the following pieces:
Length of quilt (mine was XXX long):
2 strips of 2.5" light blue solid fabric (join pieces on diagonal or straight)
2 strips of 7" batik fabric (join pieces on the diagonal)
Width of quilt (mine was XXX wide):
2 strips of 2.5" light blue solid fabric (join pieces on diagonal or straight)
2 strips of 4.5" batik fabric (I cut along the selvage so didn't have to piece anything)
[I decided to go with different width outer borders because I didn't want the quilt to be longer than 2.5 m but wanted it to be wide enough for two people.]
[I used a directional batik, and decided to have all the lines run in the same direction, so I cut the 4" border parallel to the selvage first, and then cut perpendicular to the selvage for the 7" border pieces. I joined the batik border sections for the side border (7" width) on the diagonal and made an effort to line up the pattern, but joined the solid light blue borders with straight seams so that I could use two strips for the length of the quilt.]
For the interrupted borders at each corner, cut the following:
A - 2.5" x 2.5" square of batik fabric - 4 times (I used the large triangles that were cut away from the diagonal joints and cut the fabric so that the pattern strips go diagonally across each square, see photo)
B - 2.5" x 4.5" light blue fabric - 4 times
C - 2.5" x 7" light blue fabric - 4 times
D - 4.5" x 7" batik fabric (line up the fabric so that the stripes are going along the 7" length of the piece, see photos) - 4 times
Join A to B along 2.5" wide side four times. Join C to D along 7" wide side 4 times. Join one CD piece to the right side of an AB piece (two times) and to the left side of an AB piece (two times). See the photo for this to make more sense.
You want to end up with 2 wonky 4-patches that have the following order (clockwise from top left corner):
D-B
C-A
These are for the top left and bottom right corners of your quilt.
And you should have two mirrored wonky 4-patches that go:
B-D
A-C
These are for the top right and bottom left corners of your quilt.
Join the pieces to each side of your top and bottom border. Make sure you join them in the right arrangement, so the 2.5" wide pieces should be the side you join to your border every time.
Sew the blue inner and batik outer borders (same length) to the sides of the quilt first.

Prepare the entire width of the top and bottom borders (including the corner pieces) and join to the quilt last.
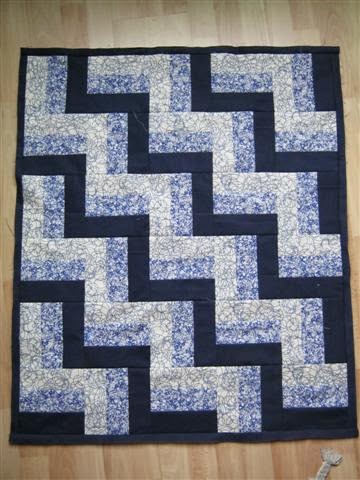
Here's the final quilt top, unfortunately, it's so big (80x100") that I couldn't fit it in the image properly...

All that's left now are the backing, batting and binding - and I leave those entirely up to you!
Enjoy :c)


.JPG)


